1. Problem
You need to create and test a
simple business rule that a business process can use. The business
process needs to validate a document and receive the result.
2. Solution
You need to perform a number of basic steps to create a rule. These include the following:
Define the input schema and XML instance.
Define the output schema and XML instance.
Define the facts that the rule uses, such as constants, functions, and predicates (vocabularies).
The first step to creating a rule is determining the logic of the rule. This example will use the logic in Listing 1 to construct the rule.
Example 1. Rule Logic
If Age < Minimum Age Then Deny Application
If Age > or = Minimum Age Then Accept Application
|
We will show how to execute the rule in Listing 1 against an XML document containing the data that will be validated. For this example, we will use the NewHire schema (Figure 1) with the schema and XML instance (Listing 2).
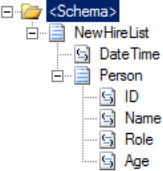
Example 2. NewHire XML Instance
<ns0:NewHireList xmlns:ns0="http://CreatingAndTestingRules.NewHire">
  <DateTime>2010-08-04T18:00:00</DateTime>
  <Person>
    <ID>1</ID>
    <Name>Mary</Name>
    <Role>Office Manager</Role>
    <Age>31</Age>
  </Person>
  <Person>
    <ID>2</ID>
    <Name>Windy</Name>
    <Role>Organist</Role>
    <Age>38</Age>
  </Person>
</ns0:NewHireList>
|
NOTE
The schema must define the <Age>
element as an integer for the comparison to work in the business rule,
which you will create in this solution. The rules engine will not
implicitly convert a String to an Int.
The next step in this solution
is to output a document. The document that is sent to the rules engine
will be modified and returned to the calling entity. If the applicant's
age is not a valid age, the document will be modified to display the
text "INVALID APPLICANT" in the <Role> element (this element must exist in order for it to be set).
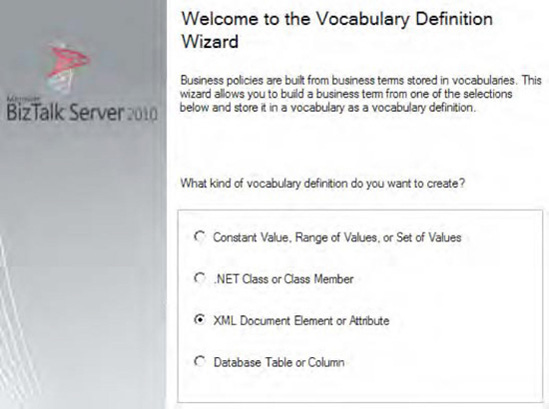
The following steps describe how to create the vocabulary using the Business Rule Composer:
Open
the Business Rule Composer from the Start menu. If the Open Rule Store
dialog box appears, select the appropriate SQL Server instance and
authentication to log on (this should be the instance against which you
want to develop).
Add a new vocabulary, which will contain the definition for the Minimum Age constant and the Age node in the input XML document. To do this using the Facts Explorer, right-click the Vocabularies folder, and create a new vocabulary named AgeValidation. See Figure 2.

To add the Minimum Age constant, right-click the Version
subfolder created in the previous step, and select Add New Definition.
The Vocabulary Definition Wizard appears. Once the wizard is open, do
the following:
Add
a new constant by selecting the Constant Value option. Enter MinimumAge
for the Definition Name field. Give a description of the minimum age of
the applicant. Click Next. See Figure 3.

On
the final page of the wizard, set Type to System.Int32, and set Value
to 18. Set Display Name to an appropriate value. Click Finish.
o add the reference to the Age node in the NewHire
XML document, right-click the subfolder of the version that was created
in step 2, and select Add New Definition. The wizard appears, and you
should then perform the following steps:
Select the XML Document Element or Attribute option, and click Next. See Figure 4.
Enter ApplicantAge for the Definition Name field. Give a description of the actual age of the applicant.
Click the Browse button, and find the NewHire XSD schema. Once you have selected the schema, a new dialog box appears where you can select the Age node. Select this node, and click OK (See Figure 5).
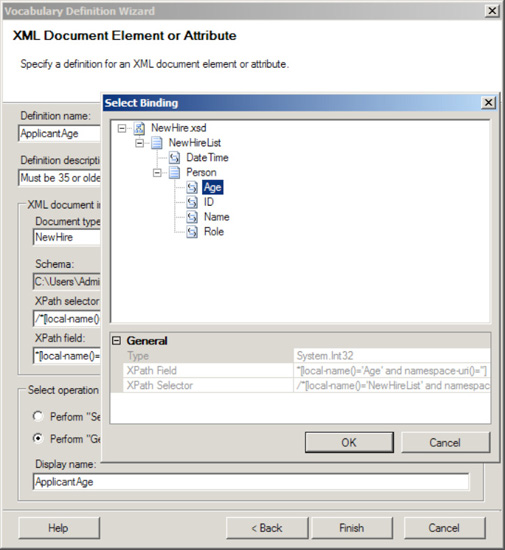
In the Select Operation section, select the Perform "Get" Operation radio button.
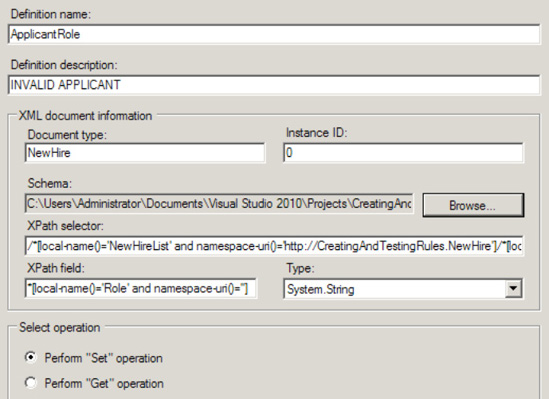
Add a reference to the Role node in the NewHire XML document. Following the same procedure as defined in step 4, use these substeps:
Select the XML Document Element or Attribute option, and click Next.
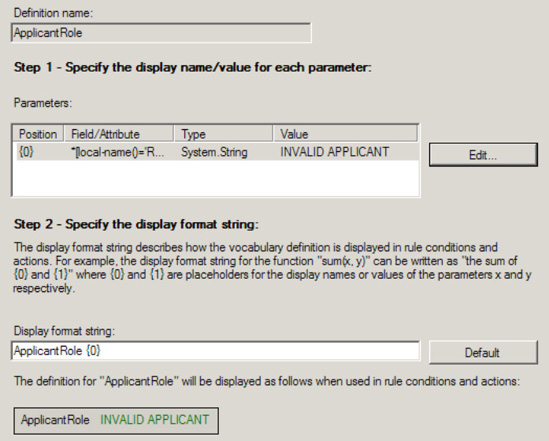
Enter
ApplicantRole for the Definition Name field. Give a description of the
role of the applicant, which will be set to INVALID APPLICANT.
Click the Browse button, and find the NewHire XSD schema. Once you have selected the schema, a new dialog box appears where you can select the Role node. Select this node, and click OK.
In the Select Operation section, select the Perform "Set" Operation radio button. See Figure 6.
Click
Next. On the final screen of the wizard, two steps are shown. For the
first step, click the Edit button and set INVALID APPLICANT as the
constant value. For the second step, keep the default values. Click
Finish when this is complete. See Figure 7.
Now, publish the vocabulary by right-clicking the newly created AgeValidation
folder and selecting Publish. This allows the vocabulary to be used by a
policy, which is where you define an actual business rule.
The steps up to this point have been putting into place the components needed to create a business rule. A rule
(or set of rules) is defined within a policy and references preexisting
functions, predicates, and any custom-defined constants (such as what
you defined in the previous steps). The following steps show how to
create the actual business rule and policy and use the vocabulary
created previously:
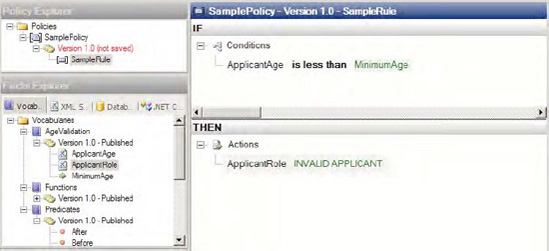
In the Policy Explorer, right-click the Policies folder, and select Add New Policy. Enter SamplePolicy for the policy name.
A version appears. Right-click this version, and select Add New Rule. Enter SampleRule for the rule name.
Select
the rule you created in the previous step. You will see an empty
condition in the right pane. Take the following steps to create the rule
(see Figure 8 for a full picture of the completed steps).
In the Facts Explorer, expand the Predicates folder, and select the Less Than predicate. Drag and drop this on the rule condition.
On the argument1 entry in the IF section of the rule composition window, drag and drop the custom vocabulary parameter ApplicantAge you created in an earlier step.
On the argument2 entry in the IF section, drag and drop the custom vocabulary parameter MinimumAge you created earlier.
In the THEN section of the rule composition window, drop the ApplicantRole parameter (created earlier).
The rule is complete at this
point. Save the rule (right-click Version, and select Save). You can now
test the rule (and policy). Use these steps to validate and test the
rule:
Right-click the Version folder of the rule you just created, and select Test Policy.
In
the Select Facts dialog box that appears, click the schema name. The
option to add an instance of the NewHireList XML will be available. You
saw an example of this earlier in this recipe (refer to Listing 2). Click Add Instance, and browse to an instance of this XML document.
Once
you have declared an instance, click the Test button. This causes the
XML instance to be passed to the rule. A full trace appears in an Output
window where you can verify whether the rule executed as expected (the
value of the XML node should change).
Right-click the policy version, and select Publish.
Right-click the policy version, and select Deploy.
You can now call the rule and
policy from an orchestration. To call the rule and policy from an
orchestration, perform the following steps:
In
an orchestration, create a message of the type that is to be passed
into the rule and a message of the type that is expected back (in this
case, the messages will both be the same NewHireList XSD type).
Drop a Call Rules shape in an Atomic Scope (or in an orchestration that has a transaction type of Atomic).
Right-click the Call Rules shape, and select the policy you created. There will be no input parameters.
NOTE
The document type must match the namespace of the schema that will call it for the rule to be callable from an orchestration.
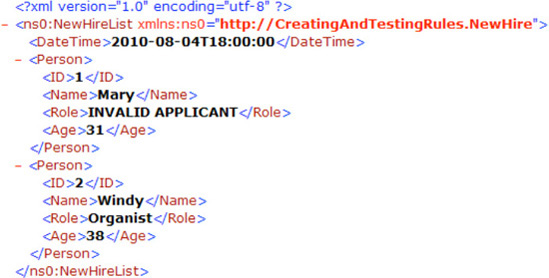
The XML instance shown in Figure 9 represents the generated output from testing the business rule created in this solution.
3. How It Works
There are additional uses
of the rules engine, including the ability to store parameters that can
be accessed from orchestrations. Similar in nature to a configuration
file that stores parameters that may need to change (such as connection
strings) once a solution is in production, these constants allow for
runtime modifications. Benefits to using the rules engine to store
configurable parameters include ease of access, simple user interface,
and enhanced read/write permissions (compared with a text file
containing configurable parameters).
To add parameters that can be
accessed from an orchestration, there are two basic steps: create the
parameters, and access the constants through the rules engine API.
The first step is to create
the parameters in a vocabulary in the rules engine and save them. You
don't need to publish them unless versioning would be helpful. If they
are not published, it is easier to modify them at runtime, because all
that is required is to right-click the value that needs to be changed
and select Modify. Once you have saved the vocabulary, running instances
of orchestrations that reference these parameters will pick up the new
values.
The second step is to add .NET code to a BizTalk Helper class to access the vocabulary through the rules engine API. The code shown in Listing 3
can be placed into a .NET assembly and should be referenced by a
BizTalk project. The method can then be called from an Expression shape
within an orchestration. This code also allows for a specific version to
be called, if desired.
Example 3. Accessing Constants Through the Rules Engine API
public bool blnGetVocabularyConstantValue(string strVocabularyName,
                                    string strConstantName,
                                    string strVersion,
                                    ref string strConstantValue,
                                    ref string strConstantType) {

   RuleStore rlsRuleStore;
   VocabularyInfoCollection vicVocabInfo;
   Vocabulary vocVocab;
   RuleSetDeploymentDriver rsdDriver = new RuleSetDeploymentDriver();
   Hashtable hshTable;
   LiteralDefinition litDef;
   Boolean blnConstantFound = false;

   rlsRuleStore = rsdDriver.GetRuleStore();

   if((strVersion == null) || (strVersion == "")) {
    vicVocabInfo = rlsRuleStore.GetVocabularies(strVocabularyName,
                               RuleStore.Filter.Latest);
   }
   else {
    vicVocabInfo = rlsRuleStore.GetVocabularies(strVocabularyName,
                               RuleStore.Filter.All);
   }

   // check to see that the vocabulary searched on has returned data
   if(vicVocabInfo.Count > 0) {
    for(int x=0;x<vicVocabInfo.Count;x++) {

    vocVocab = rlsRuleStore.GetVocabulary(vicVocabInfo[x]);

    // Check to see that the version equals the version being searched for
    // or that the version passed in was a wildcard (Null)
    if((strVersion == null) || (strVersion == "") ||
    ((vocVocab.CurrentVersion.MajorRevision + "." +
      vocVocab.CurrentVersion.MinorRevision) == strVersion)) {

     // Initialize the hashtable to the number of definitions on the vocabulary
hshTable = new Hashtable(vocVocab.Definitions.Count);
     hshTable = (Hashtable)vocVocab.Definitions.SyncRoot;

     // check that the constant being searched for exists in the vocabulary
     if(hshTable.ContainsKey(strConstantName)) {
      litDef = (LiteralDefinition)hshTable[strConstantName];

      strConstantType = litDef.Value.GetType().ToString();
      strConstantValue = litDef.Value.ToString();

      blnConstantFound = true;

      // exit loop
      break;
     }
    }
   }
  }
 return blnConstantFound;
}
|
You can use the code in Listing 4
to invoke the previous class from an orchestration Expression shape.
This allows for an alternate method of access to the rules engine
without needing the standard call using the Call Rules shape and is
useful when getting the value of a constant or other scalar value.
Example 4. Calling the Object from the Orchestration Expression Shape
// the following string is the name of the vocabulary
strVocabularyName = "Project.BizTalk.Constants";
objVocab.GetVocabularyConstantValue(strVocabularyName, "ConstantName", "",
                                                  "10", ref strValue,ref strType);